
WINBOX REAL-NAME
AUTHENTICATION

Winbox Real Name Authentication – Step-by-Step Verification Guide

The Winbox Real Name Authentication guide explains how to access the authentication interface, enter the requested account information and check the verification status after submission.

Real-name authentication involves information associated with an account and its payment details. The exact interface, required fields and verification process can change, so users should treat the information displayed in their current account as the primary reference.

Existing members can use Login Winbox before beginning the process. Users who have not yet created an account can review Register Winbox for account setup information.

✓
Quick Answer

Real-name authentication generally begins from the account or profile area. Open the relevant account options, select Real-name authentication, enter the information requested by the current interface, review the details carefully and submit the request. After submission, check the displayed authentication status before assuming that verification is complete.

What Is Winbox Real Name Authentication?

Real-name authentication is an account-verification process used to associate the information submitted through the authentication interface with the relevant account.

i
Information Shown in the Authentication Process

The screenshots in this guide show fields for a real name, bank selection and bank account number. Because these details can affect account-related transactions, they should be reviewed carefully before the authentication request is submitted.

✓
Check the Final Authentication Status

A successful submission should not automatically be treated as final approval unless the current interface indicates that authentication has been completed successfully.

Users looking for other platform features can refer to Winbox Online Casino for the main account navigation or explore Winbox Games for the site’s game-related information.

What to Prepare Before Real Name Authentication

Before opening the authentication form, make sure you are signed in to the intended account.

✓
Prepare the Required Information

Prepare the information requested by the current authentication interface. Based on the process shown in the tutorial, this can include your real name, selected bank and bank account number.

✓
Check Your Information Carefully

Check the information carefully before submission. In particular, the tutorial indicates that the submitted name should correspond with the bank-account name.

!
Use the Correct Account Information

Do not use information from another person’s account simply to complete the form. If the information requested by the current interface is unclear or different from the screenshots in this guide, follow the instructions displayed in your current account.

Winbox Real Name Authentication Step-by-Step Guide

The screenshots below illustrate the authentication process. The interface may change over time, so use them as a guide rather than assuming every screen will always appear exactly the same.
Winbox Real Name Authentication Step 1 showing the My account menu
Step 1: Open the account interface and select “Me” to begin the authentication process.
STEP 01 01

Step 1: Open Your Account Page

After signing in, open the account or profile area from the main interface.

In the tutorial interface, this is accessed through the “Me” option displayed in the bottom navigation.

Confirm that you are using the intended account before continuing with authentication.

Winbox Real Name Authentication Step 2 showing the account options menu
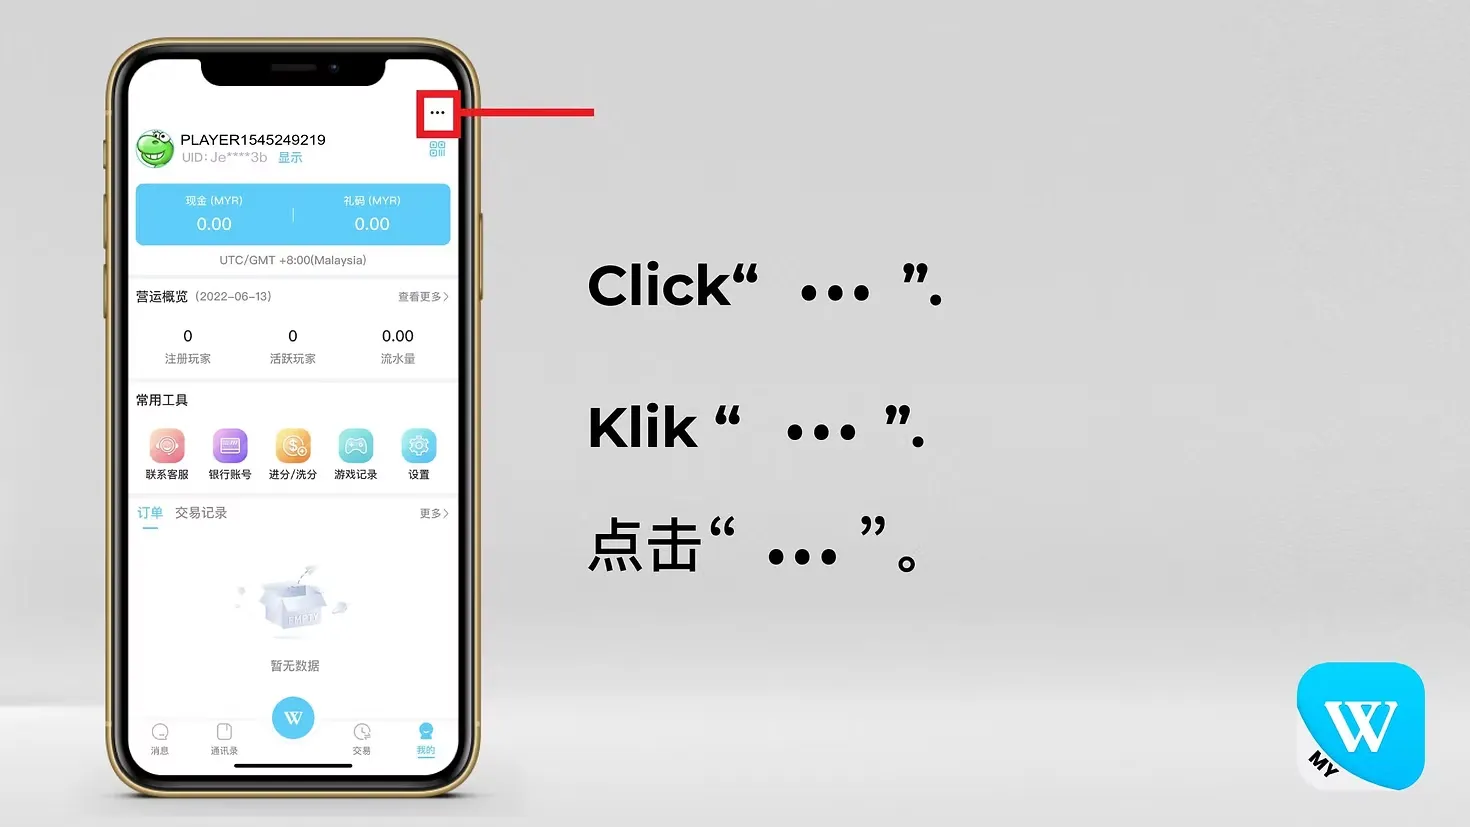
Step 2: Open the three-dot menu from the account page.
STEP 02 02

Step 2: Open the Account Options Menu

From the account page, locate the additional account options.

The tutorial screenshot shows a three-dot menu in the upper-right area of the account interface. Select this menu to display the available account-management options.
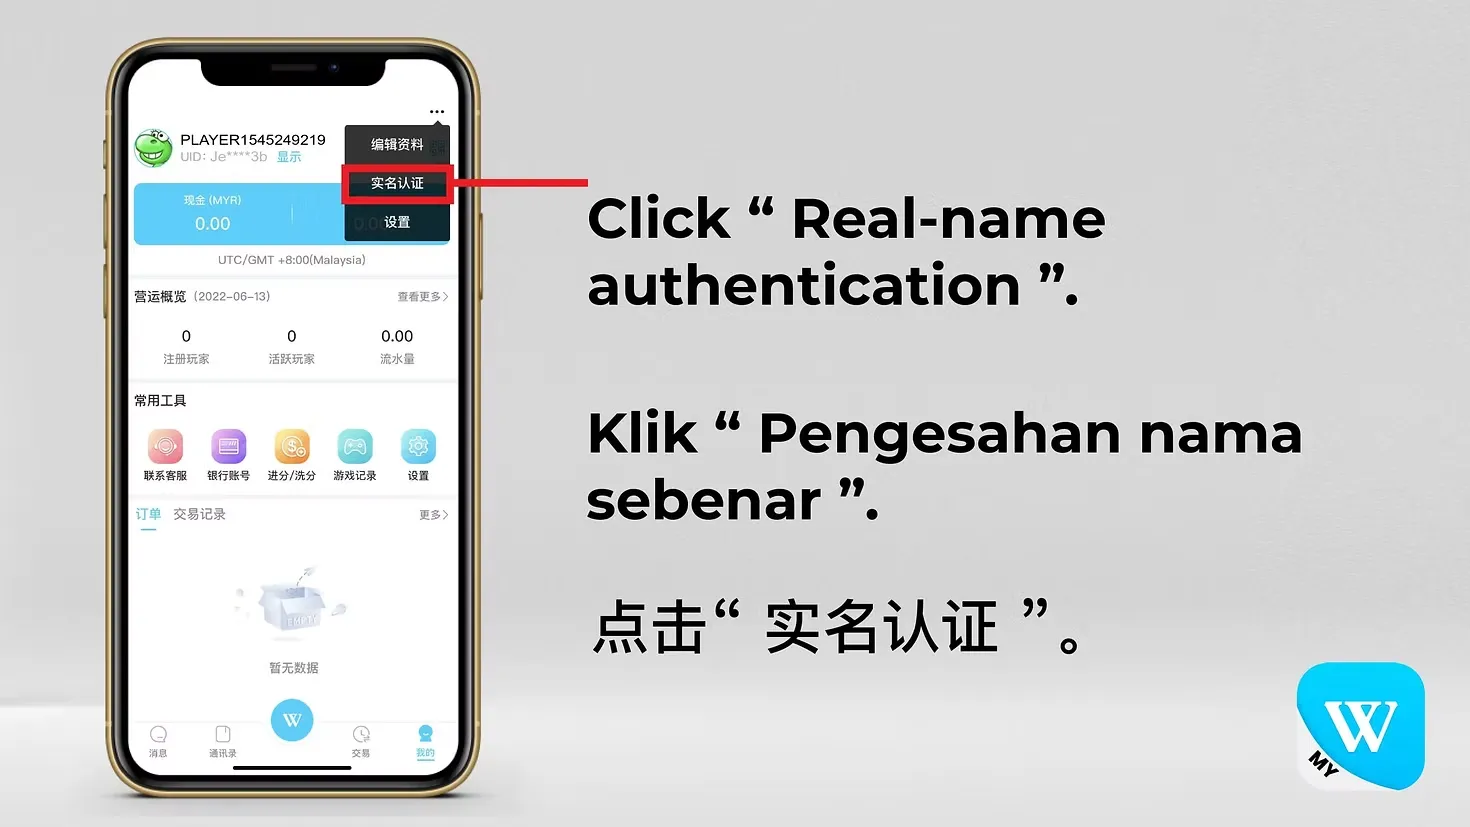
Winbox Real Name Authentication Step 3 showing Real-name authentication menu
Step 3: Select “Real-name authentication” from the account menu.
STEP 03 03

Step 3: Select Real-Name Authentication

Review the options displayed in the account menu and select Real-name authentication.

Make sure you have selected the authentication function rather than another account setting before entering personal or banking information.
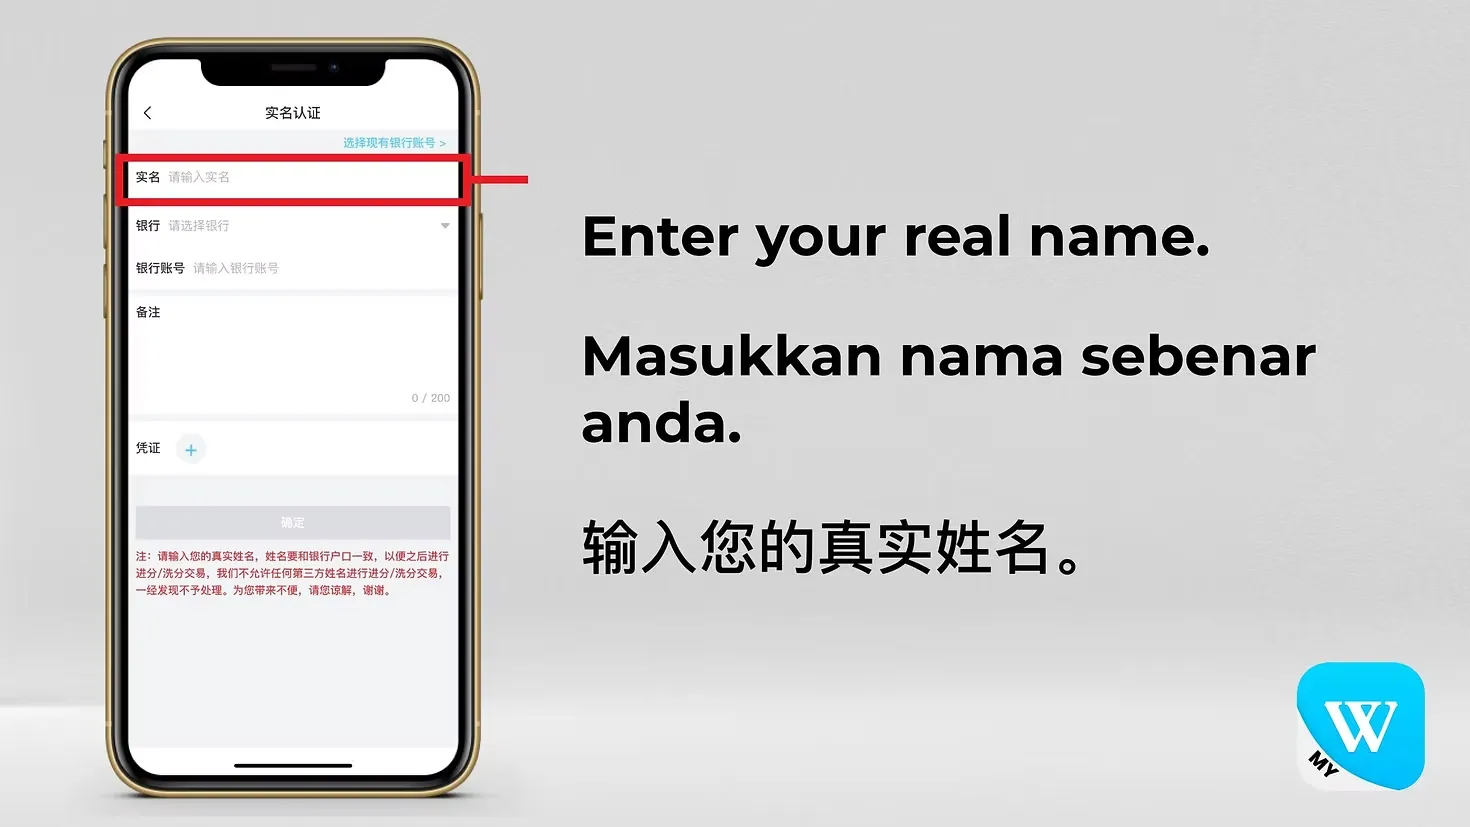
Winbox Real Name Authentication Step 4 showing real name entry field
Step 4: Enter your real name in the authentication form.
STEP 04 04

Step 4: Enter Your Real Name

Enter your real name in the field provided by the authentication form.

Review the spelling before continuing. The tutorial indicates that the submitted name should correspond with the name associated with the relevant bank account.

Avoid submitting placeholder, incomplete or intentionally incorrect information.
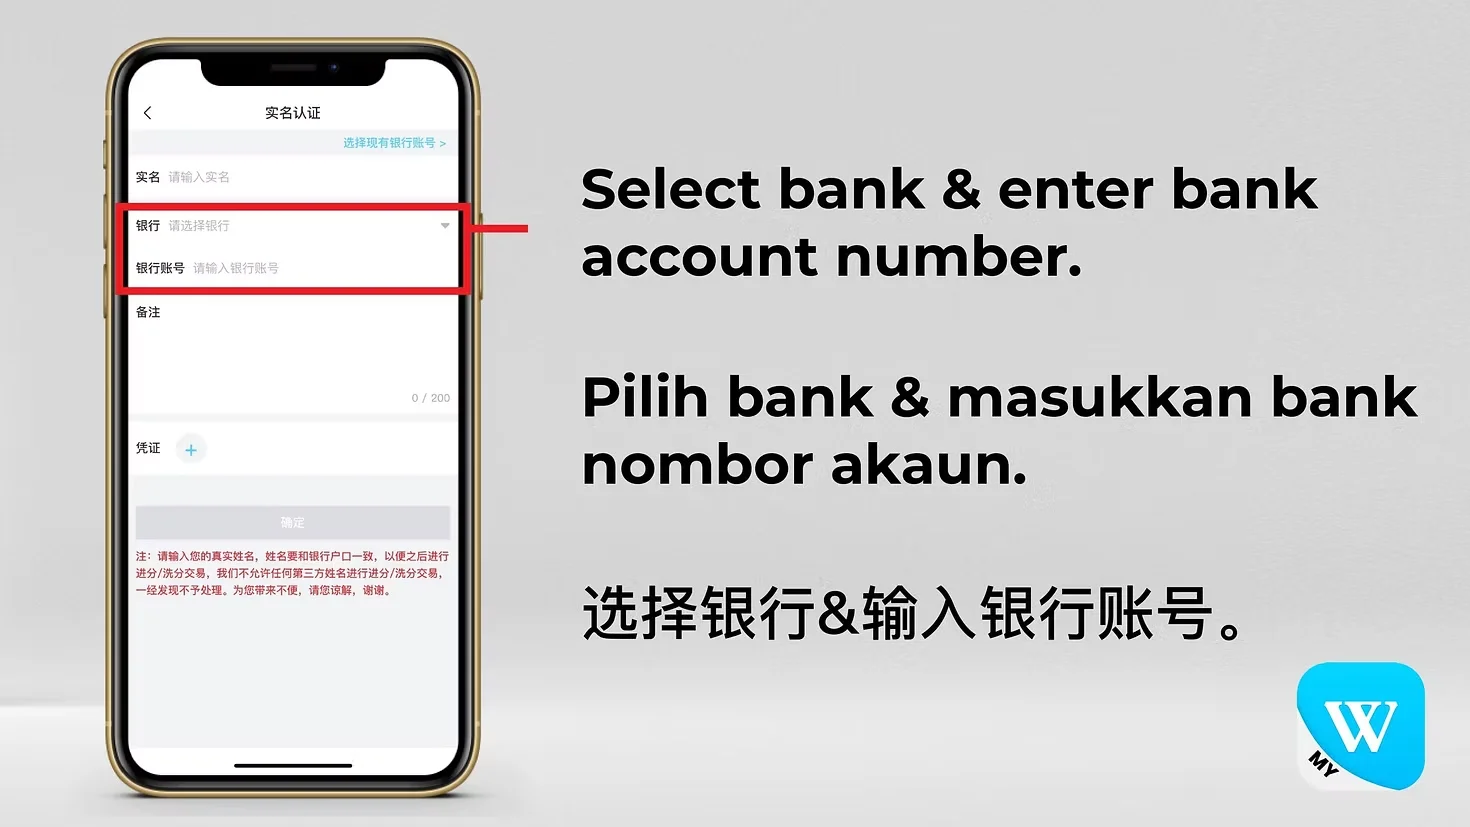
Winbox Real Name Authentication Step 5 showing bank and account number fields
Step 5: Select your bank and enter the required bank account number.
STEP 05 05

Step 5: Select Your Bank and Enter the Account Number

Select the appropriate bank from the options currently available in the authentication interface.

Enter the requested bank account number and check the number carefully before continuing.

Available banks and interface options may change, so use the selections displayed by the current authentication form rather than relying solely on an older screenshot.
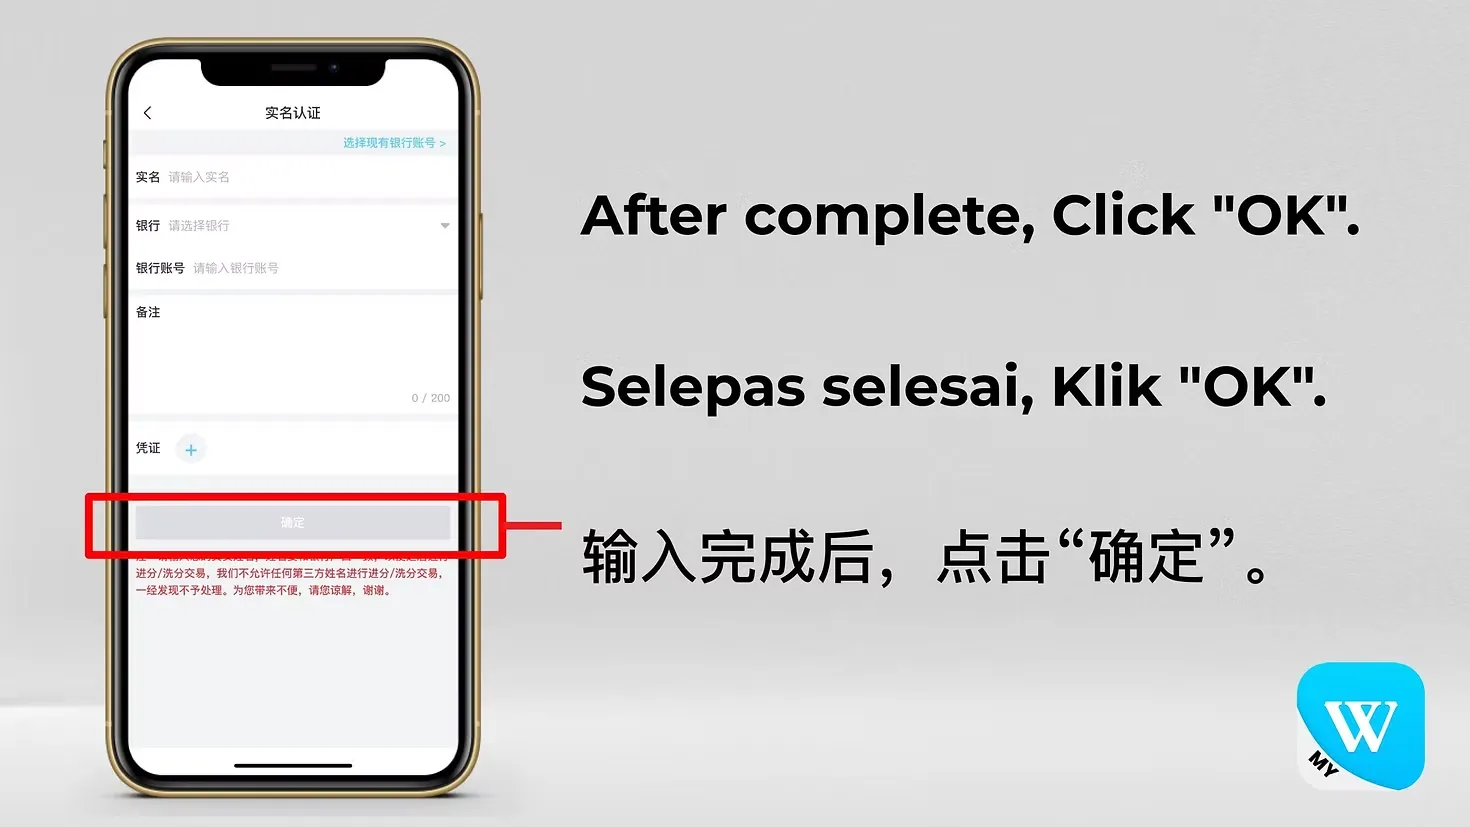
Winbox Real Name Authentication Step 6 showing confirmation button
Step 6: Review the entered information and select the confirmation button.
STEP 06 06

Step 6: Review and Submit the Information

Before submitting the authentication request, review the information you entered.

Check the real name, selected bank and bank account number. If any information is incorrect, return to the appropriate field and correct it before submission.

Once the information has been reviewed, use the confirmation option displayed by the current interface.
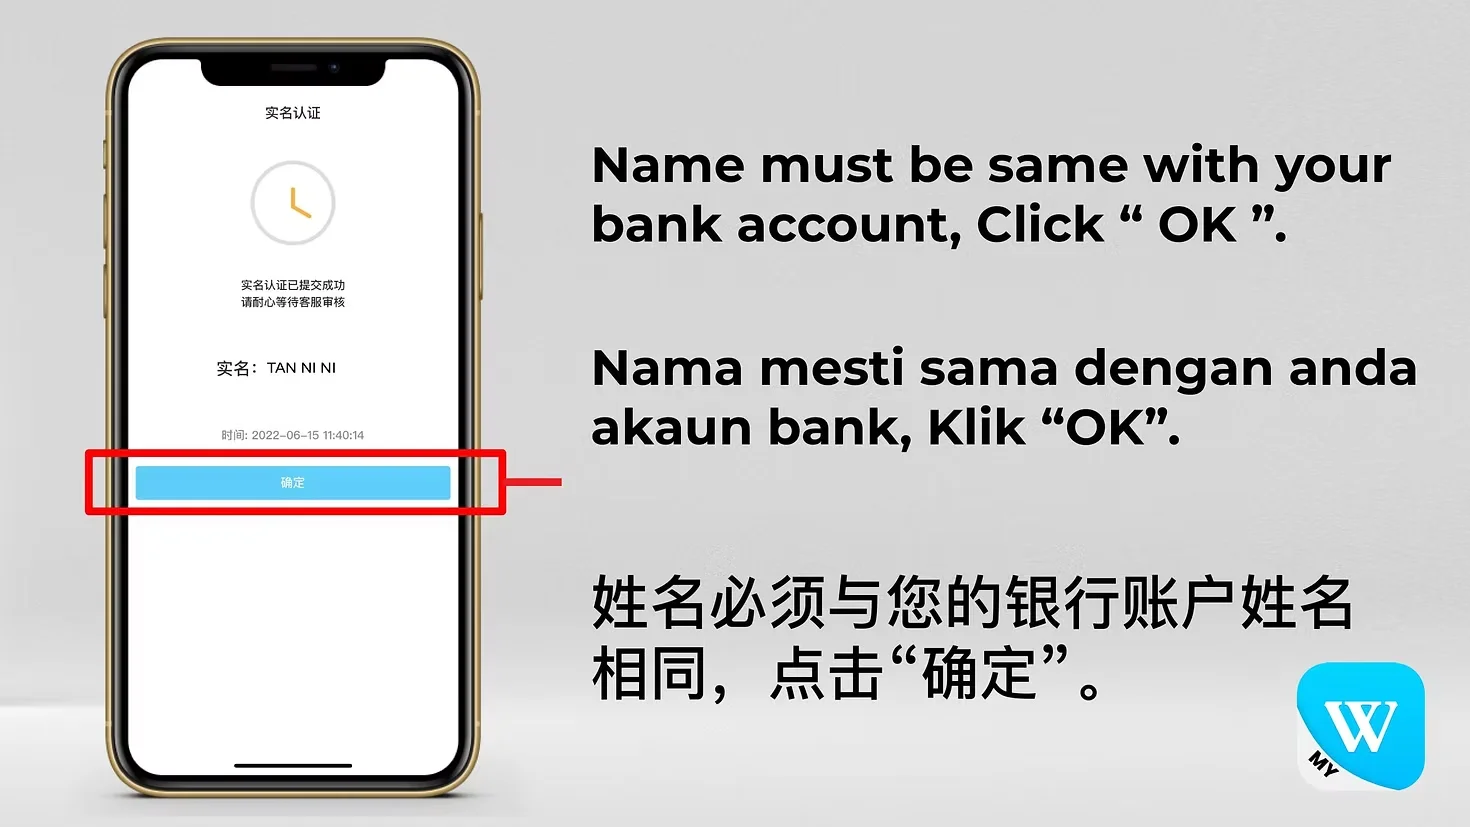
Winbox Real Name Authentication Step 7 showing submitted verification request
Step 7: Review the submitted real-name information and confirm the request.
STEP 07 07

Step 7: Confirm the Submitted Details

After submitting the information, the interface may display a confirmation or review screen.

Read the information shown on this screen before confirming the request. The tutorial specifically indicates that the name should correspond with the bank-account name.

Keep the information accurate rather than repeatedly submitting different details.
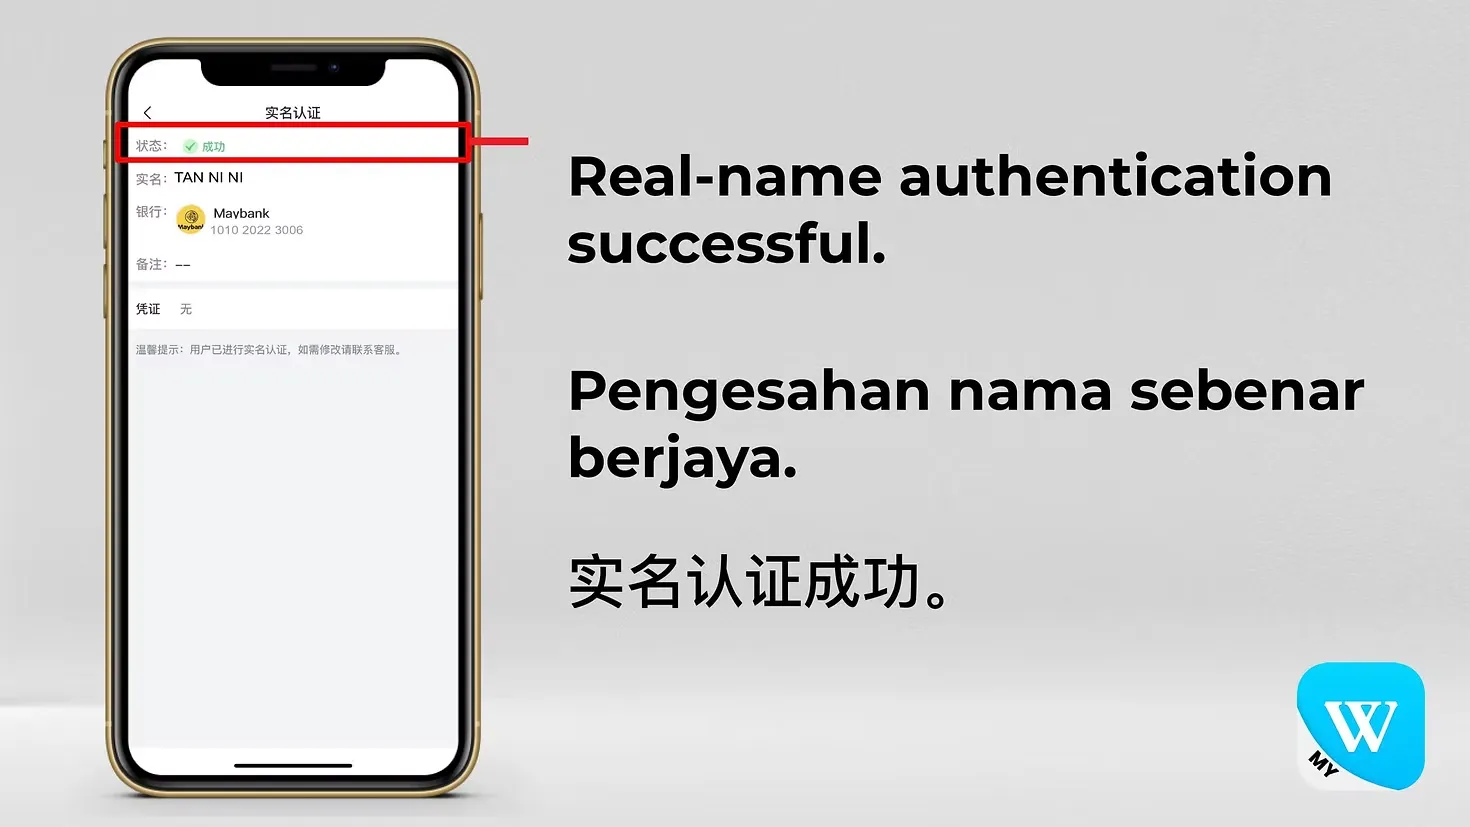
Winbox Real Name Authentication Step 8 showing successful verification status
Step 8: Check the account verification status after the request has been processed.
STEP 08 08

Step 8: Check the Authentication Status

After confirmation, check the authentication status shown by the account.

A submitted request and a successfully authenticated account are not necessarily the same stage. Use the status displayed by the current interface to determine whether further action is required.
Winbox account showing successful Real Name Authentication status
Step 9: Confirm that the Real Name Authentication status is successful.
STEP 09 09

Step 9: Confirm Successful Authentication

When the interface reports that real-name authentication has been completed successfully, review the displayed account information.

Check that the registered name and bank information correspond with the details you intended to submit.

If something appears incorrect, use the appropriate account or published support process rather than submitting unrelated information.
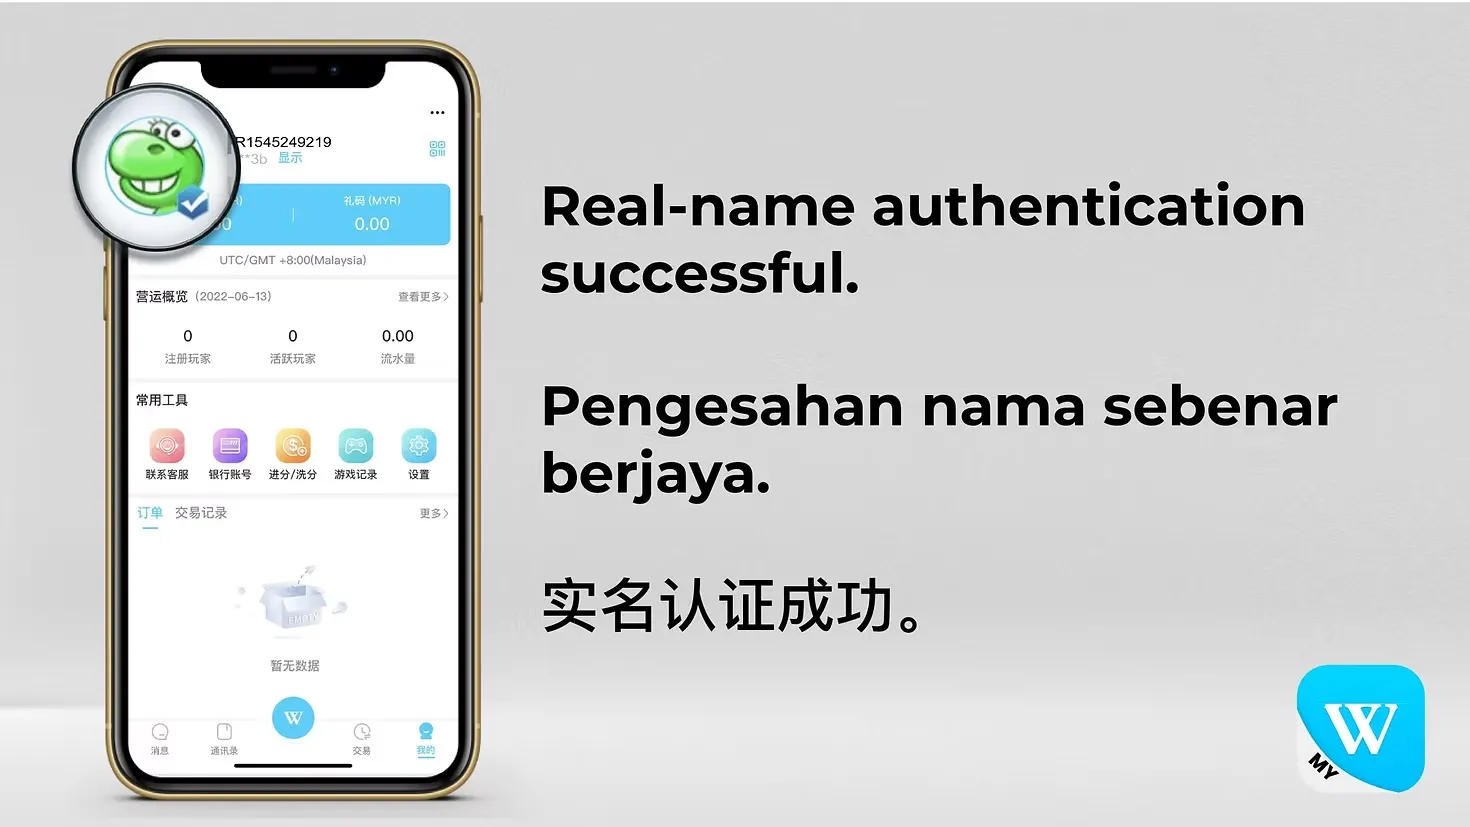
Winbox profile showing successful real-name verification badge
Step 10: Check the account profile for the successful authentication indicator.
STEP 10 10

Step 10: Check the Verified Account Status

Return to the account area and check whether the account interface reflects the completed authentication status.

The tutorial example shows a verification indicator associated with the account after successful authentication.

This final check helps distinguish an authentication request that has merely been submitted from one that the interface displays as successfully completed.

Why Your Name and Bank Information Should Be Checked Carefully

Real-name authentication involves information that may be associated with account transactions, so accuracy is important.

✓
Check Your Details Before Submission

Before submission, check the spelling of the name, the selected bank and the bank account number. Do not assume that previously entered information remains correct if your account or banking details have changed.

✓
Match the Current Authentication Requirements

The tutorial indicates that the real name should correspond with the bank-account name. Follow the requirements displayed by the current authentication interface when completing the process.

i
Follow the Current On-Screen Instructions

If the current interface requests information that is not covered by this tutorial, review the on-screen instructions before proceeding.

What Does the Authentication Status Mean?

The status displayed after submission tells you what stage the authentication request has reached.

01
Submission or Review

A submission or review screen can indicate that information has been sent.

02
Successful Authentication

A successful status indicates that the current interface is reporting the authentication as completed.

i
Wait for the Current Status

Do not repeatedly submit the authentication form simply because a request does not immediately display a successful status.

!
Security Reminder

If the status remains unclear, retain the relevant account information and use the published support process for assistance. Never provide passwords, online-banking passwords, OTPs or payment PINs to unknown third parties.

Common Real Name Authentication Problems

01

I Cannot Find the Real-Name Authentication Option

Check that you are signed in to the intended account and review the current account or profile menu.

The location of account settings can change. Use the options displayed by the current interface rather than assuming that the menu will always match an older screenshot.

02

My Name Does Not Match the Bank Account

Review the information before submitting the authentication request.

The tutorial indicates that the submitted name should correspond with the bank-account name. If the details do not correspond, do not deliberately submit information you know to be incorrect.

03

My Bank Is Not Displayed

Use the bank options currently provided by the authentication interface.

Available options may change, so the presence of a bank in an older tutorial does not necessarily establish that it is currently available.

04

I Entered the Wrong Bank Account Number

If the request has not yet been submitted, correct the information before continuing.

If information has already been submitted, review the current account options and use the appropriate account or support process rather than repeatedly submitting different details.

05

My Authentication Is Still Being Reviewed

Check the current status before submitting another authentication request.

A request that has been submitted for review should not automatically be treated as unsuccessful simply because a final status is not displayed immediately.

06

Authentication Shows Successful but My Information Looks Wrong

Review the information displayed by the current account interface.

If the registered information does not correspond with what you intended to submit, retain the relevant account details and use the published support process to request assistance.

Frequently Asked Questions About Winbox Real Name Authentication

What is Winbox Real Name Authentication?

Winbox Real Name Authentication is an account-verification process involving information submitted through the authentication interface. The tutorial shown here includes real-name, bank and bank-account information.

Where can I find the Real-name authentication option?

In the tutorial interface, authentication is accessed from the account/profile area by opening the additional account options and selecting Real-name authentication. The exact location can change if the interface is updated.

What information is required for authentication?

The tutorial screenshots show fields for a real name, bank selection and bank account number. Users should follow the fields and instructions displayed by their current account interface.

Does my name need to match my bank account?

The tutorial indicates that the submitted name should correspond with the bank-account name. Review the current authentication instructions before submitting the information.

What should I do if I enter the wrong information?

Correct the information before submission where possible. If the request has already been submitted, review the available account options or use the published support process rather than repeatedly submitting different information.

How do I know whether authentication is successful?

Check the authentication status displayed by the account. The tutorial shows a successful status after the verification process has been completed.

Should I submit the authentication form again while it is being reviewed?

Check the existing authentication status first. Repeated submissions can make it harder to determine which request is currently being reviewed.

Should I provide an OTP or password for real-name authentication?

!

Do not provide your account password, online-banking password, OTP or payment PIN to unknown third parties. Follow only the authentication process presented through the intended account interface.

Where can existing members sign in?

Existing members can use Login Winbox to access their account before opening the authentication interface.

How can a new user create an account?

Users who have not created an account can review Register Winbox for the current account-registration process.

Where can I find the available games?

Users can refer to Winbox Games for information about the platform's game categories and related pages.

Where can I find information about the agent programme?

Information about the agent-related section is available through Winbox Agent .

Scroll to Top
WhatsApp Telegram